How to Replace a Natural Gas Grill Pressure Regulator
- restaurantequipmen2
- Nov 10, 2025
- 6 min read
A natural gas grill pressure regulator plays a crucial role in maintaining safe and consistent gas flow to your grill burners. Over time, wear and tear, debris buildup, or exposure to outdoor conditions can cause regulator malfunctions, leading to low flame output or uneven cooking performance. Replacing the regulator at the right time ensures your grill operates efficiently and safely. In this guide, we’ll walk you through everything you need to know about natural gas grill pressure regulator replacement—from recognizing early warning signs and gathering essential tools to safely performing the swap and keeping your new regulator in top condition.
Common Signs Your Natural Gas Grill Pressure Regulator Needs Replacement
A gas grill regulator problem can show up in several subtle ways before it becomes severe. Knowing these warning signs can help you act early and avoid costly repairs or unsafe cooking conditions.
1. Weak or Uneven Flame
The most obvious indicator of a failing natural gas grill pressure regulator is a weak, flickering, or uneven flame. Instead of the strong blue flame you’re used to, you may notice smaller, yellowish flames that produce less heat. This means the regulator isn’t allowing enough gas to flow into the burners.
2. Low Heat Output Despite Open Valves
If your grill struggles to reach cooking temperature even though the burner knobs are fully open, the natural gas regulator for grill may be clogged or malfunctioning. Gas flow may be restricted as moisture or debris accumulates inside the regulator over time.
3. Hissing Noises or Gas Odor
Any hissing sound or faint gas smell around the regulator connection indicates a possible leak. Stop using the grill immediately and shut down the gas supply. Leaks around the grill's natural gas pressure regulator can be dangerous and need prompt attention or replacement.
4. Flame Fluctuations During Cooking
If your grill flames rise and fall without adjusting the control knobs, this inconsistency suggests internal regulator failure. A regulator’s diaphragm may become stiff or cracked with age, causing erratic gas flow.
5. Sudden Burner Shutdown
Another clear sign of a gas grill regulator problem is when one or more burners suddenly shut off during cooking, even with the gas supply active. This often points to a blockage or internal mechanical issue within the regulator.
If you notice one or more of these symptoms, it’s best to stop using the grill and plan a grill's gas pressure regulator replacement as soon as possible.
Tools and Safety Precautions Before Starting the Replacement
Replacing your grill's natural gas pressure regulator is not difficult, but safety must always come first. Due to the high flammability of natural gas, even a minor error could be dangerous. Before you begin, take time to gather the right tools and follow essential safety procedures.
Required Tools and Materials
Adjustable wrench or spanner
Replacement natural gas regulator for grill
Pipe thread sealant or Teflon tape (gas-rated)
Soapy water solution (for leak detection)
Clean cloth and small brush
Screwdriver (if access panels need removal)
Safety Steps to Follow
Turn Off the Gas Supply: Shut off the main gas valve leading to your grill. Wait a few minutes to ensure all gas inside the lines dissipates before proceeding.
Disconnect Power (If Applicable): If your grill includes electronic ignition, unplug it or remove the battery.
Work in an Area that is Well-Ventilated: Always perform natural gas grill pressure regulator replacement outdoors or in an open space with good airflow.
Avoid Open Flames: Ensure there are no lit cigarettes, matches, or open flames nearby during the process.
Inspect the Gas Line: Before removing the old regulator, check the gas line for cracks, rust, or wear. If you find damage, replace the line along with the regulator.
Use Original Equipment Parts: Always choose a genuine or compatible natural gas regulator for grill model recommended by your manufacturer to ensure correct pressure output and safe operation.
With the right tools and these precautions in mind, you’re ready to replace the faulty regulator safely and effectively.
Steps to Replacing a Natural Gas Grill Pressure Regulator
Once you’ve identified a gas grill regulator problem and gathered your tools, it’s time to replace the part. Follow these detailed steps for a smooth and secure installation.
Step 1: Locate the Regulator
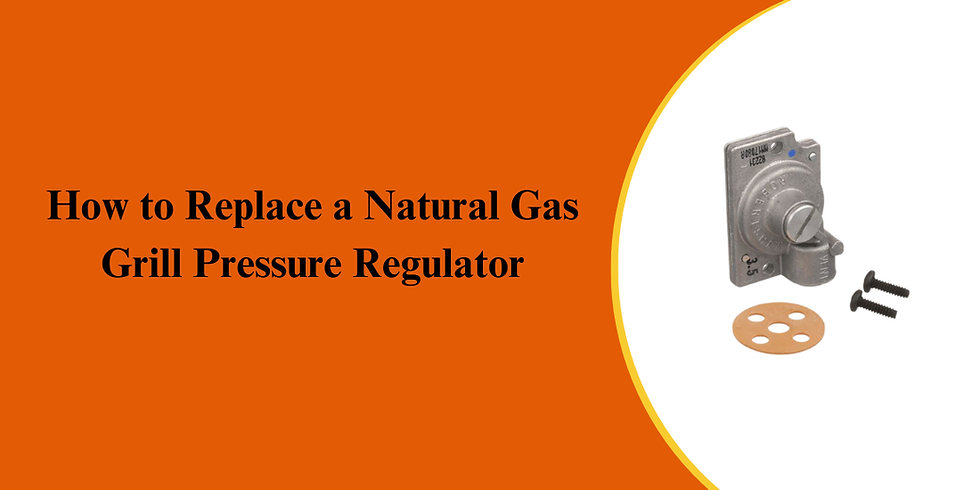
The natural gasket pressure regulator is typically located near the gas inlet, connected between the gas connection and the control manifold. It’s usually a small metal or plastic device with a vent hole and adjustment screw.
Step 2: Remove the Old Regulator
Using an adjustable wrench, loosen the fitting that connects the regulator to your gas supply line. Turn the nut counterclockwise to remove it. Gently detach the old regulator, being careful not to bend or damage the gas line.
Inspect the threads for dirt or corrosion and clean them using a dry cloth.
Step 3: Install the New Regulator
Wrap the gas line threads with gas-rated Teflon tape or apply a small amount of pipe thread sealant. This prevents leaks at the connection point. Attach the new natural gas regulator for grill to the line, tightening the fitting securely with your wrench.
Make sure the vent hole on the regulator faces downward to prevent water entry—a common cause of internal corrosion and gas grill regulator problems.
Step 4: Reconnect to the Grill
Connect the regulator outlet to the grill’s gas manifold or control valve. Tighten all connections snugly, but avoid overtightening, which can damage threads.
Step 5: Test for Gas Leaks
Before relighting your grill, it’s crucial to check for leaks. Mix a small amount of dish soap with water and brush the solution onto all connection points. Turn on the gas supply slightly and watch for bubbles forming.
If bubbles appear, this indicates a leak. Turn off the gas immediately, tighten the fittings, and retest. Repeat until no bubbles are visible.
Step 6: Perform a Flame Test
Once you confirm there are no leaks, light your grill and observe the flame. A proper natural gas grill regulator adjustment ensures steady, blue flames that reach the correct height without flickering.
If the flames are too high or too low, you can perform a natural gas grill regulator adjustment by turning the adjustment screw located near the regulator vent. Always make small adjustments and monitor results closely.
Step 7: Monitor Performance
Run your grill for 10–15 minutes to ensure consistent heat output and stable flames. If you still experience low heat or inconsistent performance, double-check the gas line connections or consider replacing other components like the burner valves.
Once confirmed, your natural gas grill pressure regulator replacement is complete, and your grill is ready for safe, efficient cooking once again.
Maintenance Tips to Extend the Life of Your New Regulator
Replacing your natural gas grill pressure regulator is only the beginning. Regular maintenance helps extend its lifespan and ensures smooth operation every time you fire up the grill.
Inspect the Regulator and Hose Regularly: Every few months, check for cracks, corrosion, or loose fittings around the regulator and hose connections. If you notice discoloration or rust, it may be time for a natural gas grill pressure regulator replacement.
Clean the Regulator Vent: The small vent hole on the regulator helps balance internal pressure. Dust, grease, or insect nests can block it, causing gas flow issues. To gently clean the vent, use compressed air or a soft brush.
Avoid Exposure to Moisture: Water and humidity accelerate metal corrosion. Keep the regulator covered when not being utilized, especially during rainy or humid weather, to prevent damage to your natural gas regulator for grill.
Perform Routine Leak Checks: Apply a soap-and-water solution around the fittings and hoses occasionally. If bubbles form, you may have a leak that needs immediate repair or replacement.
Schedule Regular Adjustments and Servicing: Periodically verify the natural gas grill regulator adjustment to maintain consistent flame levels. Professional servicing ensures all components function safely.
By following these maintenance practices, you can significantly reduce gas grill regulator problems, improve the longevity of your regulator, and ensure safe, efficient grilling performance year-round.
Replacing your natural gas grill pressure regulator is a simple yet essential maintenance task that ensures optimal performance, safety, and consistent flame control. By recognizing early gas grill regulator problems, using the proper tools, and following the correct replacement steps, you can restore your grill’s efficiency and enjoy reliable outdoor cooking. Regular inspection, cleaning, and proper natural gas grill regulator adjustment will improve the longevity of your new regulator and prevent future performance issues during grilling season.
PartsFe, your dependable source for commercial ice machine, grill, hardware replacement parts—ships quickly from top brands to minimize downtime. Find the parts you need for the lowest prices.
FAQ’s
1. Do you need a pressure regulator for a natural gas grill?
Yes, most natural gas grills need a pressure regulator to ensure a safe, steady gas flow and prevent damage from excessive pressure or inconsistent flame performance.
2. How much pressure does a natural gas grill need?
Natural gas grills typically operate at 3.5 inches of water column (around 0.25 psi), which provides the correct pressure for safe, efficient combustion and consistent heat output.
3. How to adjust a natural gas grill regulator?
To adjust a natural gas grill regulator, remove the cap, turn the adjustment screw slightly clockwise to increase pressure or counterclockwise to decrease, then test flame stability.


Comments